

CurriculumCurrículoSTEMGrades 3 to 5Grados 3 a 5STEM-ES-03
Circuits AliveCircuitos vivos
Discover the loop that makes a light turn on, test what conducts, and build a light-up sign with your name or a message.Descubra el circuito cerrado que enciende una luz, pruebe qué materiales conducen y construya un letrero luminoso con su nombre o un mensaje.
- Ways in:Formas de empezar:
- Read, 1 minuteLeer, 1 minuto
- Do, 270 minutesHacer, 270 minutos
- Simulate, 5 minutesSimular, 5 minutos
- GradesGrados
- Grades 3 to 5, and any learner ready for itGrados 3 a 5, y cualquier persona lista para ello
- TimeTiempo
- 6 sessions of about 45 minutes6 sesiones de unos 45 minutos
- CostCosto
- Under a few dollarsMenos de unos pocos dólares
The MESH'D components this unit uses:Los componentes MESH'D que usa esta unidad:ManufacturingManufacturaElectronicsElectrónica
The driving questionLa pregunta central
How does electricity know where to go?¿Cómo sabe la electricidad a dónde ir?
The loop is discovered, not announced. Learners start with one battery, one bulb and one wire, and finish with a light-up sign that shows their own name or message.El circuito cerrado se descubre, no se anuncia. Los estudiantes empiezan con una pila, un foco y un solo cable, y terminan con un letrero luminoso que muestra su propio nombre o mensaje.
Learners will be able toAl terminar se podrá
- Light an LED with the simplest possible circuit and explain the loop.Encender un foquito LED con el circuito más sencillo posible y explicar el circuito cerrado.
- Sort everyday objects into conductors and insulators by testing them.Clasificar objetos cotidianos en conductores y aislantes después de probarlos.
- Build a working paper circuit and a working breadboard circuit.Construir un circuito de papel que funcione y un circuito en protoboard que funcione.
Where the math isDónde están las matemáticas
Path logic, following the loop from one side of the battery all the way back to the other, and counting components.Lógica de trayectos: seguir el circuito desde un lado de la pila hasta regresar al otro, y contar los componentes.
Texas standards, strand levelEstándares de Texas, por componente
- Science: Matter and EnergyCiencias: Materia y energía
- Technology Applications: Practical Technology ConceptsAplicaciones de tecnología: Conceptos prácticos de tecnología
Session by sessionSesión por sesión
What to doQué hacer
- The mystery of the loop: with one battery, one small bulb and one wire, find a way to make it light.El misterio del circuito: con una pila, un foco pequeño y un solo cable, encuentre la manera de encenderlo.
- Conductor hunt: test everyday objects in the circuit and sort them into conductors and insulators.Búsqueda de conductores: pruebe objetos cotidianos en el circuito y clasifíquelos en conductores y aislantes.
- Paper circuits: make a card that lights up, using copper tape, an LED and a coin cell.Circuitos de papel: haga una tarjeta que se ilumine con cinta de cobre, un foquito LED y una pila de botón.
- Breadboard basics: build a circuit with an LED, a resistor and a push button, following a step-by-step card.Lo básico del protoboard: arme un circuito con un foquito LED, una resistencia y un botón, siguiendo una tarjeta paso a paso.
- Sign build: design and wire a light-up sign with your name or a message.Construcción del letrero: diseñe y conecte un letrero luminoso con su nombre o un mensaje.
- Gallery: show the signs and get ready to draw and explain each loop.Galería: muestre los letreros y prepárese para dibujar y explicar cada circuito.
What you needLo que necesita
- Copper tapeCinta de cobre
- LEDsFoquitos LED
- Coin cell batteriesPilas de botón
- A battery and a small flashlight bulb, for the loop challengeUna pila y un foco pequeño de linterna, para el reto del circuito
- WireCable
- ResistorsResistencias
- Push buttonsBotones
- A breadboardUn protoboard
- Card stockCartulina
Under a few dollars.Menos de unos pocos dólares.
Coin cell batteries are dangerous if swallowed. Count them out at the start and count them back in at the end, every time, and keep them away from young children. If you think one has been swallowed, get emergency medical help right away. Never connect the two sides of a battery directly with wire or foil: that is a short circuit.Las pilas de botón son peligrosas si se tragan. Cuéntelas al empezar y vuelva a contarlas al terminar, cada vez, y manténgalas lejos de los niños pequeños. Si cree que alguien se tragó una, busque atención médica de emergencia de inmediato. Nunca conecte directamente los dos lados de una pila con un cable o con papel de aluminio: eso es un cortocircuito.
What learners make and showLo que se hace y se muestra
A working light-up sign shown to an audience, with the loop drawn and explained and safe battery habits on display.Un letrero luminoso que funciona, presentado ante el público, con el circuito dibujado y explicado y con buenos hábitos de seguridad con las pilas a la vista.
Mix-ups to expectConfusiones que esperar
- Electricity gets used up in the wire. The same current flows all the way around the loop and back to the battery; what changes is energy, which the LED turns into light.La electricidad se gasta en el cable. La misma corriente recorre todo el circuito y regresa a la pila; lo que cambia es la energía, que el foquito LED convierte en luz.
- Any connection works. The loop is required: break the path anywhere and the light goes out.Cualquier conexión funciona. El circuito tiene que estar cerrado: si el camino se corta en cualquier punto, la luz se apaga.
- A bigger battery always means brighter. A bigger battery of the same voltage lasts longer but pushes no harder; voltage, not size, sets the push.Una pila más grande siempre da más luz. Una pila más grande del mismo voltaje dura más, pero no empuja con más fuerza; lo que marca el empuje es el voltaje, no el tamaño.
At homeEn casa
Try it at the kitchen tablePruébelo en la mesa de la cocina
Make a paper circuit card at home with copper tape, an LED and a coin cell. Follow the coin cell rules: count the cells out and back in, and store them where young children cannot reach them.Haga en casa una tarjeta con circuito de papel usando cinta de cobre, un foquito LED y una pila de botón. Siga las reglas de las pilas de botón: cuéntelas al sacarlas y al guardarlas, y guárdelas donde los niños pequeños no las alcancen.
Simulate, 5 minutesSimular, 5 minutos
Wire a circuitConecte un circuito
Lay wires between a battery, an LED, a resistor, a switch and a gap. Make a full loop and the LED lights; leave a break anywhere and nothing flows.Ponga cables entre una pila, un LED, una resistencia, un interruptor y un hueco. Haga un circuito completo y el LED se enciende; deje una interrupción en cualquier lugar y nada fluye.
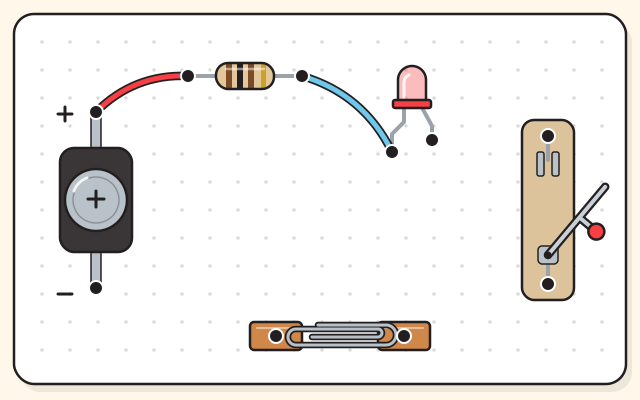
The drawing shows where it starts. It runs here once its script has loaded.El dibujo muestra dónde empieza. Funciona aquí una vez que carga su código.
Your challengeSu reto
- Finish the loop so the LED lights.Complete el circuito para que el LED se encienda. Not done yet.Todavía no.
- Make it shine bright but safe: between fifteen and twenty-five milliamps through the LED.Hágalo brillar fuerte pero sin riesgo: entre quince y veinticinco miliamperios por el LED. Not done yet.Todavía no.
- Make one big loop through every part, the resistor, the LED, the switch and the gap, so the switch turns the light on and off.Haga un solo circuito grande que pase por todas las partes, la resistencia, el LED, el interruptor y el hueco, para que el interruptor encienda y apague la luz. Not done yet.Todavía no.
Every challenge done. Now try it for real at home.Todos los retos logrados. Ahora pruébelo de verdad en casa.
Wires laidCables puestos
Current through the LEDCorriente que pasa por el LED
Current out of the battery, and back into itCorriente que sale de la pila, y que regresa a ella
Tap two ends on the board, or drag from one to another, to lay a wire; tap the switch to flip it. The dots are the moving charge and the arrows its way: out of the plus side, around the loop, back into the minus side. The bar fills at what a small LED is made for.Toque dos extremos en la tablilla, o arrastre de uno a otro, para poner un cable; toque el interruptor para moverlo. Los puntos son la carga en movimiento y las flechas su camino: sale del lado positivo, da la vuelta al circuito y regresa por el lado negativo. La barra se llena con lo que aguanta un LED pequeño.
What is happeningQué está pasando
Electricity flows only around a complete loop: out of the battery’s plus side, through every part, and back into its minus side. Break the loop anywhere, with an open switch or an empty gap, and it all stops.La electricidad solo fluye por un circuito completo: sale por el lado positivo de la pila, pasa por cada parte y vuelve por su lado negativo. Si el circuito se rompe en cualquier lugar, con un interruptor abierto o un hueco vacío, todo se detiene.
Metal carries electricity and rubber does not, so a paper clip can close a gap and a rubber band cannot. An LED is a one way valve: it lights only with its long leg toward the plus side.El metal conduce la electricidad y la goma no, así que un clip puede cerrar un hueco y una liga no. Un LED es una válvula de un solo sentido: solo se enciende con su pata larga hacia el lado positivo.
Nothing is used up in the wire: the same current that leaves the battery comes back to it, which is why the board shows the same number at both ends of the battery. What the light uses is the energy the battery supplies.Nada se gasta en el cable: la misma corriente que sale de la pila vuelve a ella, por eso la tablilla muestra el mismo número en los dos lados de la pila. Lo que usa la luz es la energía que da la pila.
A resistor holds the current down so the LED is not pushed too hard. Two AA cells push with the same three volts as one coin cell, so through the same resistor the light is about as bright: a bigger battery lasts longer, it does not push harder.Una resistencia frena la corriente para que el LED no se fuerce demasiado. Dos pilas AA empujan con los mismos tres voltios que una pila de botón, así que con la misma resistencia la luz brilla casi igual: una pila más grande dura más, no empuja más fuerte.
Things to tryCosas para probar
- Lay the last wire to finish the loop, then turn the LED around. Does it still light?Ponga el último cable para completar el circuito y luego voltee el LED. ¿Todavía se enciende?
- Run the loop through the gap and bridge it with the paper clip, then the rubber band, then nothing. Which ones are conductors?Pase el circuito por el hueco y únalo con el clip, luego con la liga, luego con nada. ¿Cuáles son conductores?
- Take the resistor out with the two AA cells and read the warning, then find the resistor that keeps the LED bright but safe.Quite la resistencia con las dos pilas AA y lea la advertencia; luego busque la resistencia que deja el LED brillante pero sin riesgo.
- Join the battery’s plus and minus sides with one wire and watch where the current goes. Never do this with a real battery.Una el lado positivo y el negativo de la pila con un solo cable y vea por dónde se va la corriente. Nunca lo haga con una pila de verdad.
The numbers come from a simple model of fresh batteries, a red LED and ideal wires; real cells sag as they tire, a coin cell most of all, and LEDs differ by color and part. Real coin cells are a swallowing danger: a grown-up counts them out and back, and keeps them far from young children.Los números vienen de un modelo sencillo de pilas nuevas, un LED rojo y cables ideales; las pilas reales se debilitan al cansarse, sobre todo la de botón, y los LED varían según el color y la pieza. Las pilas de botón reales son un peligro si se tragan: una persona adulta las cuenta al sacarlas y al guardarlas, y las mantiene lejos de los niños pequeños.
Open the simulation on its own pageAbrir la simulación en su propia páginaMagnets, fields and compassesImanes, campos y brújulasVolts, ohms and amps: Ohm's lawVoltios, ohmios y amperios: la ley de Ohm
Use it, share it, adapt itÚsela, compártala, adáptela
The credit to copyEl crédito para copiar
Free BYRD, CC BY. “Circuits Alive” from the Byrd Academy STEM Curriculum by Byrd EDU, byrdathome.org.Free BYRD, CC BY. “Circuitos vivos”, del Currículo STEM de Byrd Academy, de Byrd EDU, byrdathome.org.
This is free to use, share and adapt, even commercially, under the Creative Commons Attribution 4.0 International license (CC BY 4.0), with this credit. What Free BYRD means.Esto es libre de usar, compartir y adaptar, incluso con fines comerciales, bajo la licencia Creative Commons Atribución 4.0 Internacional (CC BY 4.0), con este crédito. Qué significa Free BYRD.
Keep goingSiga adelante
What to do nextQué hacer después
Make it harderHágalo más difícil
Add a push button to your sign so it lights only when pressed, then draw the new loop and show where the button opens and closes it.Agregue un botón a su letrero para que se encienda solo al presionarlo; luego dibuje el nuevo circuito y muestre dónde el botón lo abre y lo cierra.
For a younger onePara alguien más pequeño
With an adult, touch the two legs of an LED to the two sides of a coin cell, the longer leg on the plus side, and watch it light. Flip the cell over and see that it stays dark: electricity needs the right path.Con un adulto, toque los dos lados de una pila de botón con las dos patitas de un foquito LED, la patita más larga del lado positivo, y vea cómo se enciende. Voltee la pila y vea que no prende: la electricidad necesita el camino correcto.
Try this nextPruebe esto después
Light up a paper circuit cardIlumine una tarjeta con un circuito de papel
Lay copper tape on a card, add an LED and a coin cell, and fold the corner to close the loop and make it light.Ponga cinta de cobre en una tarjeta, agregue un LED y una pila de botón, y doble la esquina para cerrar el circuito y encender la luz.
- Ways in:Formas de empezar:
- ReadLeer
- DoHacer
- SimulateSimular
Best for ages 8 and upIdeal desde los 8 años
ManufacturingManufacturaElectronicsElectrónica
Free BYRD, CC BYHome activityActividad en casa
Wire a circuitConecte un circuito
Lay wires between a battery, an LED, a resistor, a switch and a gap. Make a full loop and the LED lights; leave a break anywhere and nothing flows.Ponga cables entre una pila, un LED, una resistencia, un interruptor y un hueco. Haga un circuito completo y el LED se enciende; deje una interrupción en cualquier lugar y nada fluye.
- Ways in:Formas de empezar:
- SimulateSimular
Best for ages 8 and upIdeal desde los 8 años
ElectronicsElectrónica
Free BYRD, CC BYSimulationSimulación
 SIM-0019
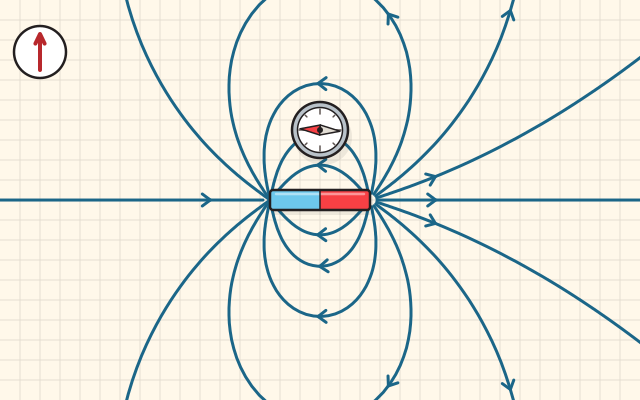
 Magnets, fields and compassesImanes, campos y brújulas
See a bar magnet's field, walk a compass around it, push and pull two magnets, and find out which things at home a magnet picks up.Vea el campo de un imán de barra, mueva una brújula a su alrededor, empuje y atraiga dos imanes, y descubra qué cosas de la casa levanta un imán.
- Ways in:Formas de empezar:
- SimulateSimular
Best for ages 5 and upIdeal desde los 5 años
ElectronicsElectrónica
Free BYRD, CC BYSimulationSimulación
 SIM-0020
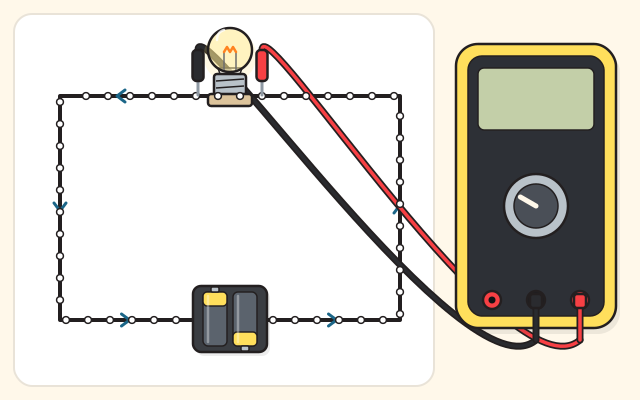
 Volts, ohms and amps: Ohm's lawVoltios, ohmios y amperios: la ley de Ohm
Light a bulb from a battery, add a resistor in a row or side by side, and read the volts and amps on a multimeter, the way an electrician checks a circuit.Encienda un foco con una pila, agregue una resistencia en fila o lado a lado, y lea los voltios y amperios en un multímetro, como revisa un circuito un electricista.
- Ways in:Formas de empezar:
- SimulateSimular
Best for ages 8 and upIdeal desde los 8 años
ElectronicsElectrónica
Free BYRD, CC BYSimulationSimulación